Sunday, September 25, 2022

The Visitation of William Morcombe

 The Visitation of William Morcombe

Research & original text by Laurie Favelle


A friend recently described an occasion where she had had a discussion with a woman who was on a mission to visit the Australian War Memorial. The woman in question was heading for her latest of several visits where she would place a Commemorative Poppy next to a specific name on the Memorial’s Roll of Honour.


The story was that the visitor would call into the Memorial, whenever in Canberra, to place a poppy next to the name of an Australian soldier, a William Morcombe. Morcombe was totally unrelated to the visitor, yet - it was alleged - he had visited her during a dream one night some years previously. During this visitation, Morcombe had identified himself, possibly referred to the presence of his name on the Memorial’s Roll of Honour and appeared to be pointing to, or holding, his head. It appears that the woman felt some obligation to recognise Morcombe’s service and her visits to the Memorial served that purpose.


The name of the visitor to the Memorial is not known, nor is the state or city from which she travelled. It appeared, however, that the visitor was very familiar with the location of Morcombe’s name and it seemed that she had always had this knowledge.


There are three Morcombes on the Memorial’s Roll of Honour and only two of them are William Morcombe - William Henry and William James. The other is Frank Keith Morcombe. Both William James and Frank Keith are from World War 2 and both were in the RAAF. William James was missing, presumed killed, during air operations with 622 Squadron and Frank Keith was killed during a training accident in South Australia. Details of injuries are unknown and both gentlemen appeared to be cousins from a rural community in Western Australia.  


William Henry Morcombe served in the First World War with the 14th Australian Field Artillery Brigade. It is this man, based on the very limited information available, I believe to be the one honoured by the visitor. His story is told below.


729 Driver William Henry Morcombe


William Henry Morcombe enlisted in the AIF on the 10th of December 1914. He was the second son, but third child, of John Thomas Vickery Morcombe and Jane Coutt Morcombe (born Thomas). His siblings were John (1867), Elizabeth (1870) and Alice (1874).


William’s enlistment gives his age as 38 years and 3 months (38 was the maximum age limit in 1914), suggesting a birth date of September, 1876. In fact, William was born in Gympie, Queensland, on the 2nd of September, 1872. On enlistment, he was actually 42 years old.


William Morcombe, who described himself as a Station Hand, married Elizabeth Leslie Humbley, in Sydney, in March 1891. A son, Frank, was born later that same year, followed by Stanley in 1893 and a third child - name, gender and date unknown. The marriage failed, with Elizabeth petitioning for divorce on the grounds of desertion. The petition was granted in 1903.


William continued to work in the bush as a station hand and general labourer, mostly in Queensland. In 1912, we find him in the Muttaburra district, between Longreach, Winton and Hughenden in Queensland, employed as a labourer on Anembo Station. Here, according to the 1912 Electoral Roll, he seems to be living with Hilda Florence Morcombe (housewife), although no evidence of marriage has yet been found. Upon enlistment, he describes himself as single.


Originally posted to the 2nd Reinforcements of the 6th Light Horse, William arrived in Gallipoli on the 6th of August 1915, the day the infamous August Offensive commenced. The 6th, however, were deployed in a sector to the far right of the ANZAC line and performed a largely defensive role until evacuated on the 20th of December 1915. While on the Gallipoli Peninsula, William was made acting Lance Corporal (temporary), but spent much of the last days there ill, either onboard a hospital ship or back in Egypt.


Following the evacuation of Gallipoli, the 6th Light Horse became part of the ANZAC Mounted Division and went on to defend the Suez Canal and later campaigns, including the Battle of Romani. Not our William Morcombe, however. Having recovered from his lengthy illness in early March 1916, William was taken on strength with the 60th Field Artillery Brigade (Gunner) and proceeded to join the British Expeditionary Force bound for the Western Front. He again transferred to the 25th Field Artillery Brigade (FAB) and finally, in January 1917, we find him as a driver in the 14th FAB.


As a member of the 14th FAB, William was deployed to the 54th Battery. On the 3rd of October, 1917, the 54th was in action east of Ypres but also on the receiving end of enemy artillery fire. Field telephone communication lines were constantly being broken by enemy fire. William was carrying out duties as a linesman and was constantly repairing damaged lines while under fire. His work that day resulted in the award of the Military Medal, with effect on 21 October 1917. His Citation reads, in part:


“No. 729 Gunner W. Morcombe, 54th Battery, who was a linesman, was continually on the lines mending the breaks and at such personal risk and disregard for his own safety enabled the Battery to complete its registration and thus successfully carrying out its task in the operations on the following day. The splendid work carried out by this man is deserving of special recognition.”


On the 2nd of November, 1917, however, William Morecombe’s luck ran out. Falling victim to a gas attack, he was soon back in England being treated for the effects which would mark him for the remainder of his life.


We pause briefly here for a short discussion on the subject of chemical weapons. The reader will be aware that the use of chemical weapons, in the form of gases such as Chlorine, Mustard and Phosgene, was common during the 1st World War. Both sides used these weapons at various times, with various degrees of success.


Mustard Gas was a much feared substance, largely due to the rapid onset of its terrifying symptoms and significant suffering, rather than its lethality. Severe blistering, both external and internal in the respiratory tract and lungs, together with blindness, both temporary and often permanent, were immediate and long lasting.


Long term effects slowly became evident after the war. Studies have revealed that “a positive correlation has been proven between exposure to mustard agents and skin cancers, other respiratory and skin conditions, leukemia, several eye conditions, bone marrow depression and subsequent immunosuppression, psychological disorders and sexual dysfunction.”  {Mary Fox, Frank Curriero, Kathryn Kulbicki, Beth Resnick, Thomas Burke, "Evaluating the Community Health Legacy of WWI Chemical Weapons Testing," Journal of Community Health, 35, (18 November 2009):}


A more substantial discussion on this subject may be found here


William Morcombe’s injuries were caused by Mustard Gas. We know this because his service record describes him suffering “gas poisoning” and, in an associated entry “Wounded S”. “S” was code or jargon for Mustard Gas, due to the presence of sulphur. 


(The original jargon was “HS”, literally short for “Hun Stuff”. The British used the “S” version late in 1917, while the USA continued with the “HS” term.)


Originally treated in 56 General Hospital, Etaples, William entered the care of Norfolk War Hospital in Norwich on November 10, 1917. It soon became apparent that he was no longer fit for duty and was recommended for discharge and pension. He returned to Australia on the 13th of May, 1918, and was discharged on the 21st of August that year. His final diagnosis prior to discharge was “DAH and Bronchitis”. DAH is short for Diffuse alveolar haemorrhage. This is persistent or recurrent pulmonary haemorrhage (bleeding in the lungs) and was often mistaken for consumption or tuberculosis. There are numerous causes, but autoimmune disorders are most common. This is a classic enduring consequence of mustard gas poisoning.


William Henry Morcombe, MM, returned to Sydney, a man much diminished by the suffering he endured from Mustard Gas poisoning. With lungs bleeding, a difficult cough, a weakening immune system and unable to work, he faced a bleak future in a country about to be hit with an influenza pandemic. 


William appears to have remained close to his former brother-in-law Norman Robert Humbley (aka Robert Norman Humbley). In July 1919 the two gentlemen were residing at the same residence at number 7 Liverpool St, Paddington, an inner Sydney suburb. It was at this address, during the evening of July 5, 1919, that William took a small brown bottle into his hand and quickly swallowed the contents. Within minutes, William Henry Morcombe was dead. He was discovered, the following morning, in bed, an empty bottle, smelling strongly of cyanide, nearby. Evidence was later given that William, while continuing to suffer the effects of being gassed while on active service, was also deeply depressed. Little did he know that there would be many who would choose the same pathway to easing their suffering.


You will recall, dear reader, that in the second paragraph of this story, mention is made of Morcombe touching or pointing to his head during his dream visitation. Symptoms of cyanide poisoning have a generally rapid onset, within a couple of minutes. The earliest symptoms are headache and confusion. Perhaps this explains the head gestures I have mentioned.


William Henry Morcombe, MM, was laid to rest in the early afternoon of Tuesday, July 8, 1919, at the Church of England Cemetery, Waverley, NSW.


A Postscript


Wilfred Owen, the acclaimed First World War poet, wrote a graphic, yet moving, description of a mustard gas attack. Owen’s most significant works were written in the period 1917 to 1918. He was no back room poet describing war from the comfort of a fireside and lounge chair. Owen was a soldier, a Military Cross recipient and killed in action late in 1918. His biography can be found here.


Here is his seminal piece Dulce Et Decorum Est Pro Patria Mori


Saturday, April 17, 2021

Isaac Althorp Ridgway

Lt Isaac Althorp Ridgway
6 Battalion AIF


Isaac Althorp Ridgway
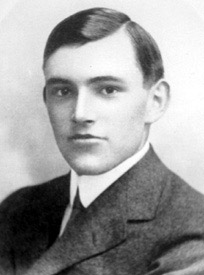
Isaac Althorp Ridgway (Source: de Ruvigny Vol.1 p 306)

During the First World War, 27 officers of the Australian Customs Service served their country of birth, or adoption, in the military forces or in a support capacity. Isaac Althorp Ridgway was one of them.


Lat.34˚21’N Long. 28˚5’E
The Mediterranean Sea, 12th May 1915.
“UNTO Almighty God we commend the soul of our brother departed, and we commit his body to the deep; in sure and certain hope of the Resurrection unto eternal life, through our Lord Jesus Christ; at whose coming in glorious majesty to judge the world, the sea shall give up her dead; and the corruptible bodies of those who sleep in him shall be changed, and made like unto his glorious body; according to the mighty working whereby he is able to subdue all things unto himself.” (Anglican Book of Prayer 1928)
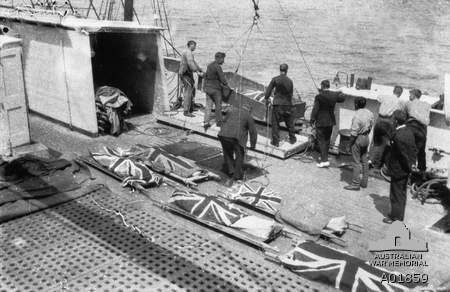
Thus spoke Rev Thomas Fielden Taylor, Captain, New Zealand Brigade, as another body slid into the sea. It wasn’t the first burial that day, nor would it be the last.


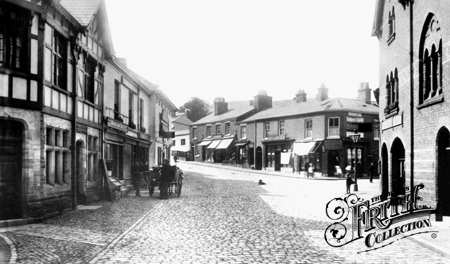
The village of Lymm, Cheshire, UK


Isaac Althorp Ridgway entered this world on the 24th of August 1896. His birth would, almost certainly, have taken place in the family home, located in the beautiful Cheshire village of Lymm. Isaac’s arrival had been preceded by two sisters, Emily and Gertrude, and a brother, Thomas (later to be Lt Col Thomas Ridgway DSO MC).
Isaac’s family enjoyed comfortable circumstances, his father, Thomas Ridgway, being a successful solicitor and his extended family having had interests in commerce, in particular the tea trade. This good looking young man was to receive the benefits of a sound education, as befitted the family position. He was also to learn the importance of an ethical and honourable code of conduct, no doubt partly a product of the family commitment to local church and community life.
As a boy, Isaac started his schooling at Mostyn House School. He progressed, in due course, to Brighton College and, subsequently, to the Victoria University of Manchester. It was at Victoria University that he achieved a Bachelor of Science (B.Sc.) with honours degree. He was also awarded the Whitworth Engineering Certificate and, in 1910, became a Master of Science at the same university. In 1911 he achieved election as an Associate of the Institute of Civil Engineers (AMICE).
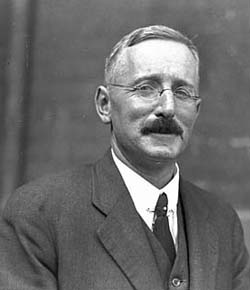
Joshua F. Ramsbotham
Source: National Archives of Australia A6247
In 1907, while undertaking his studies, Isaac became apprenticed to Mr Anthony G Lyster, Engineer-in-Chief of the Mersey Docks and Harbour Board. Having completed his professional qualifications, he continued to be employed as an assistant in various engineering projects around the Mersey and Liverpool docks. It was during this period that young Isaac would have met another harbour engineer who was to greatly influence the next few years of his life.
Joshua Fielden Ramsbotham had also served under Lyster and was employed at that time in various engineering capacities around the Mersey and Liverpool docks.There is no doubt that Ramsbotham and Ridgway struck up a friendship that was enhanced by their professional interests. Following his marriage in 1908, Ramsbotham started to look elsewhere to further his career.
In mid 1910, Ramsbotham was successful in being appointed, by the Western Australian Government, to the post of Engineer in Charge, Fremantle Graving Dock. He arrived with his wife to the sparseness of “the colonies” that same year.
The following year saw the arrival in Fremantle of an enthusiastic Isaac Ridgway to take up an appointment as Ramsbotham’s assistant. Over the ensuing two years, these two engineers tackled their duties with considerable skill and energy, providing reports and advice regarding the projects for which they were responsible. Both men gained respect from their profession and the wider community and were valued members of Fremantle society. Ridgway, in particular, appears to have endeared himself to those who knew him.
Although respected and admired, they were not, however, to be permitted to become comfortable. A new Commonwealth Government was groaning into shape and people of skill and commitment were being sort for a huge range of functions for which the new administration was realising it was responsible.
In September 1913, Joshua Ramsbotham was appointed as Director of The Commonwealth Lighthouse Service. He was shortly followed into the Lighthouse Service by Isaac Ridgway, who was appointed as a District Engineer in Queensland. Ridgway was to have a particular responsibility for providing and improving the lights on the Great Barrier Reef. However, war clouds gathered!
During his school and university years, Ridgway had variously served in the Senior Cadets, the Liverpool Rifles, 1st Cheshire’s and 1st Sussex regiments. This experience, together with his education and profession, made him an immediate target for appointment as an officer. It was no surprise, therefore, that, upon his enlistment in December 1914 following the outbreak of war, he was commissioned as a 2nd Lieutenant. What was perhaps a little surprising, however, was his appointment to an Infantry unit – the 6th Battalion, part of the 2nd Brigade, 1st Australian Division – rather than a unit more appropriate to his engineering skills.


Training in Melbourne, Ridgway joined the transport A46 “Clan Macgillivray” on the 2nd of February 1915, bound for the Middle East. Arriving in Egypt, he marched in to the 6th Battalion as part of the 2nd Reinforcements and rapidly commenced the heavy training schedule demanded of all Australian units. It was late winter when he arrived in Egypt and the cold was taking its toll. The men sweated profusely during their training and had to endure damp clothes as the cold seeped in. Many suffered with pneumonia. Many others, perhaps enjoying their freedom from wives, girlfriends and mothers, succumbed to a variety of sexually transmitted diseases and the ravages of excessive alcohol. The trials were many but were endured as the army prepared itself for what lay ahead. In early April 1915, the army climbed aboard a fleet of transports and sailed into the Mediterranean. Rumours were rife, but the general consensus was that the destination was the Dardanelles. How right they were!
The landing at ANZAC Cove commenced in the early hours of April the 25th 1915. First ashore was to be the 3rd Brigade as the covering force, followed by the 1st and 2nd Brigades. The 3rd Brigade, despite considerable confusion as a result of having been landed in the wrong location, was considered to have achieved their objective by around 7.30 am and the other brigades were commencing their landing. In any case, it was too late to stop them. With them was young 2nd Lt Isaac Ridgway and his mates in the 6th Battalion.
The next few days were a desperate battle for survival. Casualties were heavy and units were seriously mixed up. Leadership in many cases fell to those who had the skills or personality to rally the troops, as large numbers of officers and NCO’s were killed or wounded. Promotion was rapid, it would seem, if you survived.
The War Diaries of the 2nd Brigade and most of its battalions were lost during the events of the first couple of weeks. Valiant attempts were made, as things settled down a little in late May and June, to reconstruct the official record. Much of that reconstruction was aided by the discovery of notes removed from the pocket of Major Cass when he was wounded in early May. These show that the 2nd Brigade remained in the firing line through to the morning of the 30th of April when they were withdrawn to be reorganised and rested. Official records show that, prior to the landing, the 2nd Brigade numbered 132 officers and 4024 other ranks. A rough count of casualties provided by Cass indicate that in the first four days following the landing his brigade had suffered 58 officers, killed or wounded, and 1625 other ranks, killed or wounded.
Through all this, Isaac Ridgway survived!
During the landing at ANZAC Cove, the British and French had been similarly engaged in a little bloodbath of their own.They had landed into hell at the aptly named Cape Helles and had attempted to advance along the peninsula toward a small Turkish town called Krithia. They had failed, brutally, to achieve their objective! The answer to the problem, apparently, was to provide reinforcements. The New Zealand Brigade, together with the Australian 2nd Brigade, now somewhat reinforced and rested (although still well below full strength with only 2568 men), were chosen for the honour.
During the night of the 5th of May the 2nd Brigade, together with the New Zealand Brigade, boarded a number of small steam packets for the two hour journey to Cape Helles. They landed on the morning of the 6th and settled down to await orders and their fate. They wouldn’t have long to find out!
The full account of what became known as the 2nd Battle for Krithia is worth reading. For the purposes of this story, however, we will only touch briefly on the detail. The morning of the 8th of May saw the New Zealand Brigade ordered to attack. By midday they were at a standstill, having suffered heavy losses. Frustrated with this further failure to achieve his objective, Hamilton decided for one last push. “At 4pm”, he says, “I issued orders that the whole line, reinforced by Australians, should on the stroke of 5.30, fix bayonets and storm Krithia and Achi Baba.” The 2nd Brigade performed superbly in a classic frontal assault. Firstly in Artillery Formation, then in line of companies, they stormed across 1000 yards of open country and bled to death. In one hour they were done, with over 1000 dead and wounded fertilizing the Turkish field. The 6th Battalion, alone, lost 365 killed and wounded and Isaac Ridgway was one of those lying in agony, waiting for help to arrive.
Help did arrive!
Displaying enormous courage and endurance, stretcher parties worked throughout the night of the 8th to rescue those that they could. Ridgway was located and removed to the rear where he received treatment before being evacuated to the hospital ship HMHS Braemar Castle. Ridgway had received two bullet wounds impacting the bladder, rectum and epigastrium. This type of wound was very common at Krithia as enemy fire was from trenches across flat country. These wounds were also almost impossible to recover from in 1915, with death the most common outcome. As a result, after some four days of agony, Isaac Ridgway died on the 12th of May and was buried at sea.
Official records show that Ridgway’s burial service was conducted by Captain Thomas Fielden Taylor, a New Zealand Anglican Chaplain, with his body being committed to the sea at Lat.34˚21’N, Long. 28˚5’E (approx. 190 km SE of Crete at a depth of about 2500 ft).
Shortly after Ridgway’s death, notification of him being wounded was received, in the first instance, by his former boss in the Lighthouse Service, Joshua Ramsbotham. It was necessary for Ramsbotham to make representations to army records for the correct notifications to be sent to Ridgway’s family in the UK, by which time, of course, their son was deceased. Ramsbotham was obviously mortified with the death of his young protege. It is known that he penned a paper to be read before the Liverpool Engineering Society in 1918 (reference). In 1915, he also wrote a newspaper article which was widely published, particularly in WA.
Others had also been deeply impacted by Ridgway’s death. In a period where Australia and Australians suffered great loss, this young man had been singled out by those who knew him well as a person worthy of memorialising. I am grateful to a person known only to me as “Brigadier-General”, on the Great War Forum website, for the following words and photographs:
“I'm glad this thread came back up as recently while visiting St John's Church in Fremantle Western Australia I was able to take some photographs of memorials & plaques in the Church to Lt Ridgway. He had worked at Fremantle Harbour for a few years prior to the war and had obviously made a big impression on the locals.
Some of the photos are below.
The first is of a carved angel near the altar. There are two of these and 4 soldiers are commemorated on them. Lt Ridgway has one to himself and the other three soldiers are named on the other angel.”


There is one final mystery concerning the Ridgway story. The return of kit belonging to deceased soldiers was contracted to Thomas Cook & Co. There was considerable delay in completing the return of Ridgway’s belongings to his family in Cheshire. However, it all appears to have been received by his father by January 1917. Included in the list of items was “one Valise (sealed)” and within that valise was “one black kit bag”. On the 27th of February 2008 the Great War Forum received a post from a member calling himself “birch1”. The post stated, in part, “Last week we were clearing out my father-in-laws house and found a kit bag belonging to Lt I A Ridgway. The stencil shows he served in the 6th Battalion of the AIF………No idea where my Father in Law got it from.” I have attempted to contact “birch1” without result.
Isaac Althorp Ridgway, having been committed to the deep, rests undisturbed with many of his brothers in arms. May he rest peacefully, comforted that his life is not forgotten.


Burial at sea WW1
Burial at sea WW1
Source: AWM A01859


Sunday, September 6, 2020

Shamrocks For a Hero - Part 3


The Rogue, the Archbishop and the Shamrocks


John Wren 
(1871-1953)
AWM P01383.018
In his 1990 contribution to the Australian Dictionary of Biography, James Griffin describes John Wren as an entrepreneur. More recently, Melbourne Murder Tours chose to label Wren as a Victorian Gangster and a prominent member of the Pony Track Gang.  Australian author, Frank Hardy, having published his fictionalised account of John Wren's life in the novel Power Without Glory, found himself in court being sued by the Wren Family. Apparently, the fictionalised version was too close for comfort.

Whatever the truth is around the nature and conduct of Wren's business activities, there appears to be little doubt that he was a strong Irish Catholic and benefactor of the poor. He was involved in gambling, the owner of race tracks and race horses, a boxing promoter, newspaper owner, land speculator and much more. He was wealthy and had some influence in political circles.

Daniel Mannix
(1864-1963)
Australian Dictionary
of Biography
Daniel Mannix was born in Ireland in March 1864. His parents, Timothy and Ellen, were very devout Catholics and, although not wealthy, were able to ensure their children received a solid education. Receiving his doctorate of divinity in 1895,  he moved directly to a lectureship in philosophy and held the chair of theology at St Patrick's College, Maynooth.

Mannix was appointed as Archbishop of Melbourne in 1912, arriving to an approving welcome in the Easter of 1913. With the outbreak of war in 1914, Mannix drew attention as an opponent of Billy Hughes' conscription referendum and was sympathetic to the sentiments behind the 1916 Easter Rising in Ireland. It was also during the war years that he gained the friendship and support of a       prominent local Irish Catholic businessman, John Wren.
"Raheen", Melbourne

Of course, it was pure coincidence (it was - surely?) that these two influential members of Melbourne society should find themselves living opposite each other, the churchman in "Raheen" and the entrepreneur in "Studley House". Both men were in the habit of walking to work, the one to an office in the city, the other to St Patrick's Cathedral, frequently together.
"Studley House", Melbourne

It is at this point that our narrative must give mention to the 1918 St Patrick's Day celebrations in Melbourne. In March 1918 the war was still raging, particularly on the Western Front, and the Easter Rising in Ireland of 1916 was still fresh and raw to those of Irish Catholic heritage. To others, the Rising was a treacherous and treasonable act, justly suppressed by the British. Of course, it would have been obvious that an Irish Catholic parade celebrating an Irish Catholic saint was going to have symbols referencing the 1916 Rising, and it did. Reports indicate that Sinn Fein flags and other "seditious and treasonable emblems" had been a strong feature of the Parade. The Dubbo Liberal and Macquarie Advocate of Tuesday, March 26, 1918, had much to say on the topic and was baying for the blood of Dr Mannix:

"The growing feeling of unrest and irritation caused throughout the Commonwealth by the seditious utterances of Dr Mannix.....culminated in Melbourne on Thursday in a citizens' demonstration of protest in the Melbourne Town Hall.......Scattered about among the audience were a few women who wore Sinn Fein colours openly, while some well-known representatives of the Peace Society were also there. Ill feeling ran high, and women armed with hat-pins, to which were attached the Sinn Fein colours, attempted to stab other women. Numbers were forcibly removed..."

The Lord Mayor of Melbourne, totally blind-sided by the unexpected display of "disloyal" emblems, was not in the least disposed to grant permission for the next St Patrick's day march in 1919. His position was simplified, in a manner of speaking, with the return of troops and, with them, the arrival of the Spanish Flu. The 1919 St Patrick's march did not happen! The 1920 procession, however, was a totally different story!

The 1920 St Patrick's Day parade was to be one of the first, perhaps even the first, large public gathering in Melbourne since the end of the war. The flu epidemic was over and the majority of troops had returned home.. There was cause to have a celebration and John Wren was determined that St Patrick's Day would do the job.

Plans to hold the parade were strongly opposed by groups such as The Ulster & Loyal Irishmen's Association and the Women's National League and strong representations were made to the City Council to ban the parade. Wren, with a typical stroke of genius, formed a Parade Committee strongly laced with veterans and Victoria Cross recipients, one of whom was Maurice Buckley.

"Wren and his Parade Committee promised that there would be no disloyal display or official recognition of Sinn Fein and assured the Council that the British flag would be at the head of the display.

Maurice Buckley VC DCM was a member of the committee and made a remarkable gesture. Referring to his Victoria Cross he said: 'This cross is my most treasured possession, yet I will pledge it to you now that we will abide by your ruling loyally.' The Lord Mayor, Cr Aikman, replied: 'Your gesture satisfies me that loyal and true Australians will take part in the celebrations.'

Perhaps what was more important to Buckley and his comrades was the knowledge that veterans of the war would be marching together for the first time since the end of the war. More than 10,000 veterans marched in the parade, watched by 120,000 cheering supporters lining the route." (History Teachers Association of Victoria - Agora magazine 2020 - full article here)

12  VC's with Mannix & Wren. Buckley
is  standing directly behind and between
Mannix & Wren
The parade in progress


The parade was a resounding success, made all the more memorable by the spectacle of Mannix and Wren waving royally from an open limousine and escorted by 14 Victoria Cross recipients, all mounted on magnificent white horses. As promised, there were no disloyal displays. However, one report suggests that a casual observer would have had some difficulty seeking out a British flag.

As previously mentioned, John Wren had been supportive of returned soldiers. He had, in fact, provided financial backing to Albert Jacka to assist his entry into a business venture. He also funded Maurice Buckley as he commenced a road contracting business in country Victoria (SMH May 30, 2009 Ben Doherty).

In mid January 1921, Buckley's risk taking brought him undone. Following a dare and a bet while working at Boolarra, Buckley jumped his horse over some railway gates. Not satisfied that he had proven the point, he then attempted a second jump. Unfortunately his horse had had enough and Buckley was thrown, apparently hitting his head on the gates and road. He remounted, but was latter found unconscious on the Gunya Road. Taken to hospital, he fought on for 12 days, but died on January 27. He was 29 years old.

Buckley's funeral was a substantial affair. Although not quite the spectacle that was seen at the St Patrick's Parade the previous year, it was a major event. A gun carriage, complete with mounted troopers, was provided by the Army. Brigadier General Brand, under whom Buckley had served, ordered that as many 4th Brigade men as possible should attend. Ten Victoria Cross recipients were pall bearers and included Captain Albert Jacka, Captain F H McNamara, Captain R Grieve, Captain W J Symons, Lt R V Moon, LT J Rogers, , Lt W Ruthven, Lt G M Ingram, Lt W Dunstan and Sergeant W Peeler.
Maurice Buckley's funeral procession

A full Requiem Mass was conducted at St Patrick's Cathedral with many clergy officiating. The Cathedral was full and hundreds of mourners gathered outside. Past pupils of Christian Brothers' School, Abbotsford, formed a guard of honour. Attending veterans numbered more than 500.

The Adelaide Southern Cross newspaper, quoting from the "Catholic Press" reported on Friday 25 February 1921, in the following terms:

At St Patrick's Cathedral on the day of Sergeant Buckley's funeral, just as the last blessing had been given to all that was mortal of the brave soldier, a kindly hand quietly placed a bunch of shamrocks, tied with the green, white and gold colours of the Irish Republic upon the coffin; another sympathiser quickly transferred it to the head and fastened it there by the tricolour ribbons, so that when the wreaths and flowers were removed from the coffin, to be placed in the floral car, there was such difficulty in detaching the shamrocks that they were allowed to remain, then it was covered with the Union Jack - that faithful little bunch of shamrocks accompanied the dead hero right to the end of life's sad closing chapter. It still clung to the coffin at the brink of the grave as the flag of the British Empire was finally removed, and the cherished remains of one of Australia's bravest sons were laid to rest. May the same dear little shamrock keep ever green his hallowed memory until the shadows break and "Angel faces smile, that we have loved long since and lost the while".

Maurice Vincent Buckley VC, DCM, was interred with other members of his family, including his brother, Gerald, whose name he had borrowed to rejoin the army in 1916.

It is not known whose "kindly hand" placed the shamrocks upon Buckley's coffin. Perhaps his mother; perhaps some recent lover; perhaps Violet Hewitt, whose husband's body Buckley had identified on the battlefields of the Western Front. We will never know, but it is something to reflect upon that the small bunch of shamrocks rests with Maurice in the grave on the left.